
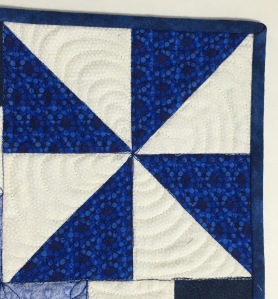
Half-square triangles are a staple in the quilter’s repertoire. HSTs can be put together in a multitude of ways to create many striking quilts, but a favorite of mine is the Pinwheel, a simple 4 patch of rotating HST. Pinwheels in a variety of sizes can add an interesting design element to a modern sampler quilt, such as the Ravelry BOM quilt-along.

There are almost as many construction methods for HST as there are layout options! My go-to methods are 1) Easy Angle ruler, 2) Two-at-a-time (TAAT) and recently 3) 4 at a time (4AAT) which is perfect for this project since you need 4 units for the pinwheel!
Let’s explore these methods for turning HSTs into Pinwheel quilt blocks.
4 at a time HST
The basic idea is that you will sew your two fabrics right sides together, along the outer edge of a large square, then cut on both diagonals to create 4 HSTs at once. This is my preferred method for pinwheel blocks because the 4 units will match. The downside to the $AAT method is that you will be working with bias edges, which can stretch and distort your final block. With careful pressing and minimal handling of the units, problems can generally be avoided.
Step 1 – Cut an oversize square…for a 6″ pinwheel block, you will need two 5-1/2″ squares. Remember that the pinwheel stands out better with high contrast in the colors you choose.
Step 2 – Place fabrics right sides together and sew a 1/4″ seam around the outside edge.
Step 3 – Cut twice on the diagonal to create 4 triangles.

Step 4 – Press carefully to the darker fabric and trim to the desired size. For a 6″ pinwheel, the HST should be trimmed to 3-1/2″.
Step 5 – Lay out the pinwheel block as a 4-patch, rotating each HST a quarter turn. Sew the two rows and then the final block. The pinwheel block will measure 6-1/2″ at this point, with a finished size of 6″ once it is sewn into the final quilt layout.
2 at a time HSTs
Sewing HSTs two at a time can help sew down your stash or scrap bin. Since you are working with more individual pieces, this method will be a little slower, but it gives you more variety in fabric choices if you want a scrappy quilt.
The basic math for any 2AAT HST is to add 7/8″ to the final unit size. A 6″ pinwheel block is made up of four 3″ HST, so with this method we will use 3-7/8″ as our starting size.
Step 1 – Cut two squares of contrasting fabric at the desired size (3-7/8″ for a 6″ pinwheel block). Use a pencil or fabric marking tool to draw a diagonal line on the wrong side of one of the fabrics.
Step 2 – Stitch 1/4″ away from the diagonal on both sides of the line.
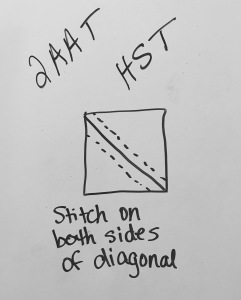
Step 3 – Cut along the drawn line.
Step 4 – Press to the darker fabric and trim to the desired size. For a 6″ pinwheel, the HST should be trimmed to 3-1/2″.
Step 5 – Lay out the pinwheel block as a 4-patch, rotating each HST a quarter turn. Sew the two rows and then the final block. The pinwheel block will measure 6-1/2″ at this point, with a finished size of 6″ once it is sewn into the final quilt layout.
HSTs with the Easy Angle Ruler
Bonnie Hunter introduced me to the Easy Angle Ruler and I love it! You start with strips in the desired width of your HST, then use the ruler to cut pairs of triangles that are matched and ready to sew.
Step 1 – Cut two strips of contrasting fabric in the desired width. For 6″ pinwheels, we will start with 3.5″ strips.
Step 2 – Start with the Easy Angle Ruler right-side-up and cut your first pair along the diagonal edge.
Step 3 – Flip the Easy Angle Ruler up vertically, and cut the second pair along the straight edge.
Step 4 – Flip the ruler back down to the starting position to cut the next pair. Repeat steps 2 and 3 to make as many HST pairs as needed. Pinwheels need 4 HST per block.


Step 5 – Sew each pair along the diagonal edge.
Step 6 – Press to the darker fabric and trim to the desired size. For a 6″ pinwheel, the HST should be trimmed to 3-1/2″.
Step 7 – Lay out the pinwheel block as a 4-patch, rotating each HST a quarter turn. Sew the two rows and then the final block. The pinwheel block will measure 6-1/2″ at this point, with a finished size of 6″ once it is sewn into the final quilt layout.

Quilters like options. Thanks for the tutorial!!!
LikeLike
As a teacher, I appreciate there are many ways to do things. As long as you are happy with the result, I am happy too!
LikeLike
Great tutorial!
LikeLike
Thanks Kris! Glad you found it.
LikeLike